
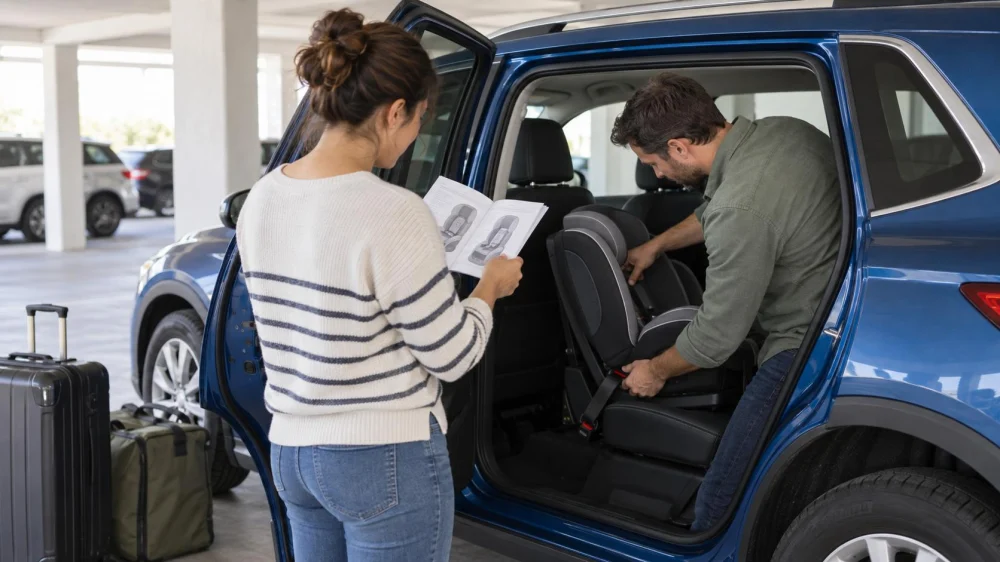
Rental Car Child Seat: Reserve, Inspect, and Install
On this page
Quick answer
Reserve a child restraint by type, child size, and travel date, but treat the reservation as a request until the rental company confirms availability. At pickup, inspect the seat, obtain its instructions, check that it fits the child and vehicle, install it before leaving, and request another seat or vehicle if anything is missing, damaged, incompatible, or unclear.
Reserve the right restraint
Do not request only “a car seat.” State whether you need a rear-facing seat, forward-facing seat, or booster and provide the child’s current age, height, and weight. The chosen restraint must stay within its manufacturer limits and comply with the law where you will drive.
- Ask whether the quoted fee is per day, per rental, or capped.
- Confirm whether availability is guaranteed or only requested.
- Record the reservation line item and confirmation number.
- Ask what happens if the correct seat is unavailable at pickup.
- Consider bringing a familiar approved seat when practical.
Availability at one branch does not guarantee inventory at another, especially after a flight delay or one-way change. Reconfirm shortly before travel.
Confirm the vehicle can accept it
The restraint and vehicle must work together. Ask for the vehicle owner’s manual at pickup and locate the permitted seating positions, seat-belt locking instructions, lower anchors, and tether anchors. Do not assume every rear position has the same hardware.
Account for other passengers, luggage, and multiple restraints. A vehicle category advertised online may not identify the exact model supplied, so leave time to test the real combination before accepting the car.
Inspect the seat at pickup
Inspect the restraint in good light before placing a child in it. Check the shell, base, harness, buckle, chest clip, padding, anchor connectors, tether, labels, and adjustment mechanisms. Ask for the model instructions and verify that the seat has not reached its stated expiration or service-life limit.
- Reject a seat with cracks, missing parts, frayed webbing, a nonworking buckle, or an unreadable model label.
- Ask the company about the seat’s crash and cleaning history.
- Do not add unapproved padding, clips, liners, or accessories.
- Photograph an accepted seat’s condition and identifying label for your rental record.
If you cannot confirm that the seat is complete and usable, ask for a replacement rather than improvising a repair.
Install with both manuals
Read the restraint manual and the rental vehicle’s child-restraint section. Follow the designated installation method and seating position. NHTSA advises using either lower anchors or a seat belt to secure a car seat, not both, unless the specific manufacturers’ instructions permit otherwise. A forward-facing seat should use its tether when directed.
At the belt path, the installed seat should not move side to side or front to back more than one inch. Set a rear-facing seat to the indicated recline angle. Route a harness flat and at the height specified for the direction of use, then perform the manufacturer’s fit checks.
A rental employee may supply equipment, but that does not replace the manuals or make every employee a certified installation technician. NHTSA offers a locator for trained Child Passenger Safety Technicians and notes that virtual checks may be available.
Document problems and changes
Before leaving the facility, report any missing manual, damage, odor, contamination, incorrect seat type, or installation incompatibility. Put a replacement, vehicle change, fee adjustment, or refusal in writing. Do not drive while a required child restraint is unavailable or unsecured.
If the rental vehicle is involved in a crash, follow emergency steps, notify the rental company, and follow the restraint manufacturer’s and NHTSA’s crash-replacement guidance. Do not quietly return a potentially crash-involved seat for another renter.
Frequently asked questions
Can the rental desk install the seat for me?
Policies and staff qualifications vary. Ask what help is offered, but verify the final installation with both manuals or a certified technician.
Should I use a seat belt and lower anchors together?
Usually choose one approved method. Follow the exact car-seat and vehicle instructions; do not combine methods unless both explicitly allow it.
Can I accept a different seat type?
Only if it is appropriate for the child’s age and size, permitted by law, complete, undamaged, and compatible with the vehicle.
What if the seat smells strongly of cleaner?
Ask what was used and request a different seat if residue, damage, or instructions are uncertain. Do not apply your own chemical cleaner unless the manufacturer allows it.
Do I need to check the seat again during the trip?
Recheck tightness, harness routing, and visible condition regularly and after another person moves the seat.
Conclusion and next steps
Reserve the correct restraint, save the terms, and allow extra pickup time. Inspect the actual seat and vehicle, read both manuals, install before departure, and document any substitution or defect. If you cannot create a correct, stable setup, do not leave with that combination.
Evidence note: Installation guidance comes from the U.S. National Highway Traffic Safety Administration’s Car Seat Installation Tips and Car Seats and Booster Seats. Rental availability, laws, and manufacturer instructions must be checked for the specific trip.





 MK Car Rental, LLC5.0 (4 reviews)
 Avis Car Rental3.0 (230 reviews)
 United Auto Rental4.0 (186 reviews)
 COLUSA RENT A CAR4.0 (1004 reviews)
 HH Management Rental Cars5.0 (18 reviews)
 TeslaRents4.0 (116 reviews)
 Best Fuel Saving Tips When Driving a Rental Car for Smart Travel
 Can You Extend Budget Car Rental at Hilo Airport? Tips for a Hassle-Free Experience
 A+ Car Rental: Your Guide to Convenient and Affordable Car Rentals
 How to Avoid Overpaying for Car Rental Extras
 How to Rent a Car for a Long-Term Business Stay in the US
 Do Credit Cards Cover Car Rental Insurance? What You Need to Know