
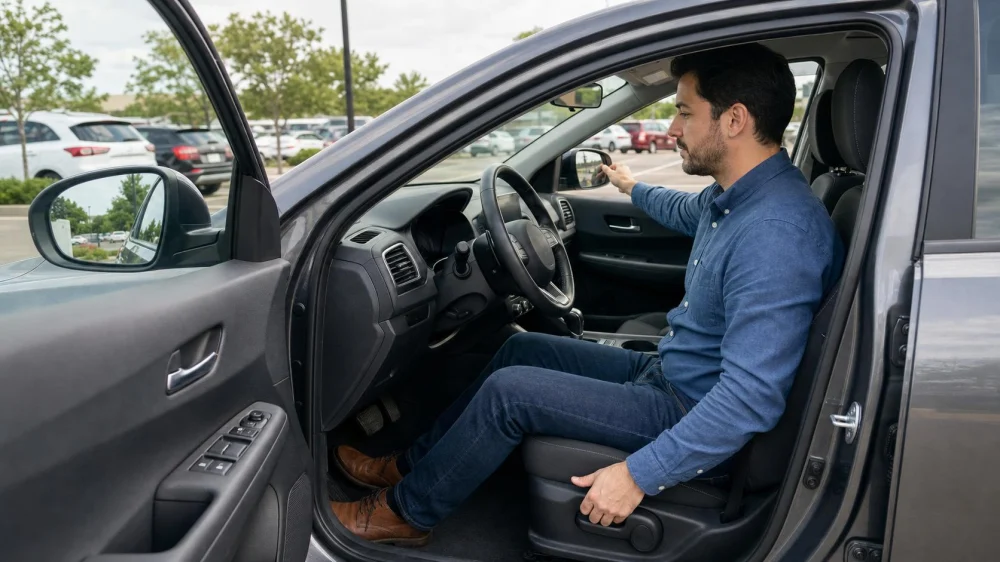
Set Up a Rental Car Before Leaving the Parking Lot
On this page
Quick answer
Before moving a rental car, keep it parked and adjust the seat so you can fully operate the pedals while sitting upright, set the head restraint and steering wheel, confirm the seat belt crosses the hips and chest, and adjust all mirrors. Locate the parking brake, lights, wipers, defoggers, hazard flashers, gear selector, and fuel or charging information. Then make one slow loop in the lot to learn braking, steering, and visibility.
Rental-car setup is a stationary fit and control check that helps a driver adapt to an unfamiliar vehicle before entering traffic. It is separate from documenting exterior damage and separate from configuring optional driver-assistance features. The goal is to operate basic controls without looking for them while moving.
Park, unload, and make space
Do the setup in a well-lit marked space, not at the curb, exit gate, fuel island, or traffic lane. Confirm the vehicle is in Park, apply the parking brake, keep the engine or drive system off when the manual allows, and place the key where it cannot be accidentally activated.
- Load luggage so it cannot roll into the driver’s footwell or block rear visibility.
- Remove rental documents, charging cables, and small objects from the seat and pedals.
- Secure every passenger and child restraint according to the vehicle and restraint instructions.
- Ask passengers to wait until the driver has finished the setup.
- Open the quick-start guide or owner’s manual while stationary.
- Photograph or report any warning light, damaged control, loose mat, or missing manual before departure.
Check that the floor mat is the correct size, is secured at its retention points, and does not overlap another mat. Push each pedal by hand only if the vehicle is fully off and the instructions permit; otherwise visually confirm there is no obstruction.
Set the seat, head restraint, and wheel
Begin with the seat rather than the mirrors. Moving the seat later changes every mirror angle.
- Set fore-aft distance. Sit fully back and move the seat until you can press the brake pedal through its required travel without straightening and locking the knee or lifting your hips.
- Set height. Create a clear view over the steering wheel and instrument panel while maintaining headroom.
- Set backrest angle. Use a comfortable upright position that keeps the shoulders near the seat while reaching the wheel.
- Adjust lumbar support if provided. Use enough support for a neutral posture without forcing the lower back forward.
- Set the head restraint. Position it according to the vehicle instructions so it supports the back of the head rather than the neck.
- Adjust steering-wheel tilt and reach. Keep the airbag aimed toward the chest, maintain clearance, and ensure the wheel does not block instruments.
- Lock every adjustment. Push gently against the seat and wheel to confirm they do not move.
NHTSA advises maintaining as much practical distance from the steering-wheel airbag while still reaching the controls; its adapted-vehicle guidance uses at least 10 inches from the breastbone as a reference. Body proportions and vehicle design vary. If you cannot reach the pedals and keep appropriate airbag clearance and visibility at the same time, request another vehicle or appropriate adaptive evaluation rather than adopting an unstable posture.
Do not use loose cushions, pedal blocks, or seat-belt clips from an unknown source. Equipment that changes driving position needs to be compatible with the vehicle and safety systems.
Check seat-belt fit
Buckle before driving. NHTSA advises placing the lap portion across the hips, not the stomach, and the shoulder belt across the middle of the chest and away from the neck. Never route the shoulder belt behind the back or under an arm.
- Adjust the upper anchor when available so the belt does not cut across the neck.
- Remove twists and bulky objects between belt and body.
- Pull the belt snug without adding aftermarket slack devices.
- Confirm every passenger has a functioning belt or appropriate child restraint.
- Ask the rental company for another vehicle if a required belt is damaged, will not latch, or will not retract normally.
Pregnant drivers and passengers should follow NHTSA and healthcare guidance for belt and seat position. Do not disable an airbag or alter the seat because of pregnancy without authoritative vehicle and medical guidance.
Adjust mirrors and verify blind areas
Set mirrors only after the seat and steering wheel are final. Clean obvious smears first so night glare and rain do not hide vehicles.
- Inside mirror: center the full rear window without leaning from the driving position.
- Driver-side mirror: aim it outward enough to cover the adjacent lane while retaining the visual reference recommended by current NHTSA guidance.
- Passenger-side mirror: set it from the normal seating position to extend coverage along the other side.
- Confirm overlap. Watch a parked vehicle move from the inside mirror into a side mirror as you change your visual reference—not while driving.
- Practice the shoulder check. Mirrors reduce blind areas but do not show everything. Make sure head movement is not blocked by luggage, clothing, or the seat.
NHTSA recommends aiming outside mirrors farther outward to reduce blind areas but still instructs drivers to look over the shoulder before changing lanes. A blind-spot warning is an aid, not permission to skip direct observation.
Locate essential controls
Point to and operate each control while parked. Return it to the normal state before proceeding.
- start/stop procedure and key-fob backup location;
- gear selector, Park confirmation, and parking brake;
- turn signals and hazard flashers;
- headlights, high beams, and dashboard brightness;
- front and rear wipers and washers;
- front defogger and rear defroster;
- horn location;
- door locks, window controls, and fuel-door release;
- fuel gauge, fuel type, charging state, and charge-port release;
- climate controls needed to keep windows clear.
Identify safety-system indicators but do not build this setup around changing their settings. Rental vehicles can have unfamiliar driver-assistance features and menu names. Review the manual and rental-company guidance while parked, and remember that assistance systems do not replace an attentive driver.
Pair a phone, enter navigation, choose audio, and set climate before moving. Mounting and phone-use laws vary by state. If a task requires attention after departure, pull over legally and park.
Complete a stationary systems check
- Start the vehicle using the documented method.
- Confirm the dashboard completes its normal lamp check and note any warning that stays on.
- Press the brake and assess whether the pedal feels obviously abnormal; do not attempt diagnosis.
- Turn the steering wheel slightly only as needed to understand effort and return it to center.
- Verify the rearview camera appears in Reverse while the brake is held and the area is clear.
- Check wiper sweep and washer aim if weather makes it necessary.
- Confirm windows defog and essential lights function.
- Walk around before reversing to check for people, animals, curbs, posts, and low objects.
Backup cameras have limits. NHTSA advises checking the area around the vehicle because children, pets, and objects can remain outside camera view. Use mirrors, direct observation, and the camera together.
Do not leave the lot with a brake warning, airbag warning, seat-belt problem, damaged mirror, loose seat, steering concern, or essential control you cannot operate. Contact the rental desk and request instructions or another car.
Take a low-speed familiarization lap
If the rental facility provides a safe circulation route, make one slow loop before joining public traffic.
- Release and reapply the brakes gently to learn response.
- Make slow left and right turns to judge steering ratio and vehicle width.
- Check mirror transitions and shoulder-check movement.
- Confirm turn signals cancel normally.
- Notice hood, rear, and curb reference points without staring at them.
- Practice one controlled stop in a clear area.
Stop immediately if the car pulls strongly, makes an alarming sound, shows a warning, has abnormal braking or steering, or does not fit the driver. Return to a safe space and contact the rental company; do not use a public road as the diagnostic test.
Limitations and important notes
This guide is a general pre-drive setup, not vehicle-specific operating instructions. Controls, airbag systems, driver aids, EV procedures, adaptive equipment, and seat-belt designs vary. The owner’s manual and rental-company instructions take priority.
Drivers with limited reach, strength, vision, hearing, neck movement, or lower-limb control may benefit from a certified driving rehabilitation specialist and authorized adaptive equipment. A last-minute improvised device can interfere with pedals, airbags, belts, or seating systems.
Frequently asked questions
Should I adjust mirrors before or after the seat?
After. Set the seat, backrest, head restraint, and steering wheel first because every seat movement changes the driver’s eye position and mirror view.
How far should I sit from the steering wheel?
Maintain as much practical airbag distance as possible while comfortably reaching and fully operating pedals and steering. NHTSA commonly references at least 10 inches from breastbone to wheel. Vehicle and body fit still matter.
Can blind-spot monitoring replace a shoulder check?
No. NHTSA describes driver-assistance features as aids while the driver remains engaged. Mirrors and sensors have limitations; directly check the adjacent area before moving laterally when safe.
What if the seat belt rests on my neck?
Use the vehicle’s upper-belt height adjuster if available and recheck seat height and position. Do not route the belt behind your back or under your arm. Ask the rental company for another suitable vehicle if fit cannot be made safe.
What should I do if I cannot find a control?
Stay parked, read the quick-start guide or owner’s manual, and ask rental staff. Do not search menus, reach around, or experiment while moving.
Next steps
Save this order: seat, wheel, head restraint, belt, mirrors, controls, stationary check, low-speed lap. Complete it before navigation sends you toward the exit. If the vehicle does not fit your body or an essential safety feature is damaged or confusing, request another vehicle before accepting the risk on public roads.





 Go Rentals3.0 (2 reviews)
 Enterprise Rent-A-Car4.0 (204 reviews)
 Vestige Auto LLC0.0 (0 reviews)
 Comfort: Transit Services4.0 (5 reviews)
 Enterprise Rent-A-Car4.0 (653 reviews)
 Budget Car Rental3.0 (110 reviews)
 How Much to Rent a Car Seat with Car Rental: A Complete Guide
 How to Get to SeaTac Car Rental Facility from Airport Easily
 Can You Rent a Car Seat with a Car Rental? Here's What You Need to Know
 Do Car Rental Prices Go Up Closer to the Date? Tips for Getting the Best Deal
 Does AAA Cover Car Rental Insurance? What U.S. Drivers Need to Know
 The Best Car Rental Locations for Exploring US Cities on Foot